Begin by cutting your wood. Cut the oak board in half at 15" (for the 24-jar rack) and the dowels into thirds for 12" segments.
Mark holes for drilling by lining up and poking through the diagram paper you can print here. Mark 3 drill holes for each layer of your spice rack. 4 layers for a 24 bottle rack and 5 for a 30 bottle rack.
Drill holes making sure that your drill is level so your holes are straight. Only drill holes 1/2" deep so that you don't drill all the way through the wood. There are tools you can use to do this, but we just eyeballed it.
Once the holes are drilled, sand all the wood, focusing especially on placed where the wood was cut or drilled.
Wipe off all the dust from sanding with a slightly damp rag and let the wood dry completely
Set out a place to stain your wood. I laid out newspaper and used a box to hold the pieces off of the ground while they dried.
Do one coat of stain and let dry according to the directions on the stain can. Then repeat for a second and, if needed, third coat.
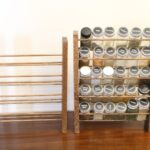
Once all the pieces have dried completely you can put all the dowels in the holes and line them up to fit together like a puzzle. I find it easiest to start at the top and work your way down to the bottom of the rack.